mantaray Posted October 9, 2013 Author Share Posted October 9, 2013 Managed to pick up a damaged door at billing, it had 2 big dents in the main panel but all the edges are in great condition. So after a few hours of heating and bashing I now have a very good serivicable door. Having found out that my Parts suplier in germany has added front panel repair sections to thier catolag, I deceided that i would relpace the repairs I did 15 years ago with new sections. On the drivers side I ended up replaceing the light bessel as well. It's been sat untouched for the last 2 months as I have not had time due to other work and the fact that the next thing that needs doing is to have the under side blasted again, as I messed up with the paint. It should have been painted onto bare metal and not primmer, and so it has not griped properly . The problem is the weather is now on the change and I have to get it to and from the blasters with out it geting wet, plus the fact I don't have the £200 needed at the moment. 1 Quote Link to comment Share on other sites More sharing options...
Sutty2006 Posted October 10, 2013 Share Posted October 10, 2013 You're getting there Chris, slowly but surely all the pieces are coming into place cant wait to see it all done up! The arches will look good in my opinion 1 Quote Link to comment Share on other sites More sharing options...
mantaray Posted May 31, 2014 Author Share Posted May 31, 2014 Long time since an update, mainly because nothing has been done to the car. Starting to think about it again, and have been looking at programable ECUs for the V6. what are your veaws on the different makes. Have read up a bit on Canems and they sound quite good has anyone used them before? 1 Quote Link to comment Share on other sites More sharing options...
Paul Barrett Posted June 1, 2014 Share Posted June 1, 2014 That's the spirit Chris, need a bit of mojo back now you have the funds. I had an emerald setup some years ago which was good Thought about the megasquirt route? Quote Link to comment Share on other sites More sharing options...
mantaray Posted January 6, 2015 Author Share Posted January 6, 2015 Well I can't beleive that it has been over 18 months since I have had anything to update on this thread. As I have had an empty garage over Xmas I put the time to good use and have done a bit more to the A. I got the under side blasted again back in September, but apart from giving it a coat of etch primmer nothing else had been done. So it is now all seem sealed and ready to be painted again. I have also fitted the d/s door and wing to check the fittment and gaps, and with a bit of fettaling I have managed to get what I concider to be a good fit. Bit of filler Bit Small repair to wing 1 Quote Link to comment Share on other sites More sharing options...
CRAZYDAVE Posted January 7, 2015 Share Posted January 7, 2015 Some great work there will be a cracker when complete :thumbup Quote Link to comment Share on other sites More sharing options...
doveyte2800 Posted January 7, 2015 Share Posted January 7, 2015 Chris where did you get the replacement lamp bezells from as i require some for my other manta, also who is your supplier for the front top of the valance sections under the headlights. cheers Ian Quote Link to comment Share on other sites More sharing options...
mantaray Posted January 7, 2015 Author Share Posted January 7, 2015 replacement lamp bezell was from the front I had cut of a car I scraped, valance sections came from Leidinger Tuning http://www.ebay.nl/itm/Manta-A-Frontblech-Frontschurze-Reparaturblech-links-/221653315711?hash=item339b91307f http://www.ebay.nl/itm/Manta-A-Frontblech-Frontschurze-Reparaturblech-rechts-/221653315810?pt=DE_Autoteile&hash=item339b9130e2 This is there main site. http://stores.ebay.nl/Opel-Tuning-Leidinger/_i.html?rt=nc&_nkw=manta%20A&_sid=112131255&_trksid=p4634.c0.m14.l1513&_pgn=1 Quote Link to comment Share on other sites More sharing options...
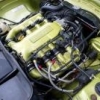
mantaray Posted January 10, 2015 Author Share Posted January 10, 2015 Spent the last few days starting to clean and paint the engine ready for a trial fit. Engine all stripped down. Starting to build it all back together, Modifyed Cav sump fitted. Next was to look at how to modify the oil pipes inorder to fit an external oil cooler, Never been too happy with the oil cooler between the heads on the V6 as they have a tendency to fail and can take the cyl. heads out when they do fail. 1 Quote Link to comment Share on other sites More sharing options...
Paul Barrett Posted January 10, 2015 Share Posted January 10, 2015 Had one go on my astra mk3 van some years ago, was a pain In The A hole. Good to see your progressing well. Quote Link to comment Share on other sites More sharing options...
mantaray Posted January 18, 2015 Author Share Posted January 18, 2015 Bit more done over the last few days. Having had a look through my collection of doors the best one had been cut off the doner car as both door pins were sized solid in the hinges. So the first job of the week was to try and remove the door pins. This is my tried and tested system: 1. Heat up door hinge with blow torch, get it nice and hot. 2. leave to cool down. 3. Block of bottom of hinge with something, the plastic plugs work fine if you still have them. 4. Pour salfuric acid into hinge pin and leave to soak. If you can't get Salfuric acid, brick cleaner acid will also work but takes longer. 5. Repeat step 4 when acid has evaporated, and keep repeting for a few days. 6. Try removing pin with door pin puller. 7. If pin still will not move, repeat from 1. After doing the above for 4 days, I now have a good door that I can trill fit to the car. Door gaps were not bad but after a bit of fetteling there alot better. Front back Another job sorted was to enlarge the battery box fitted in the boot. Have also made a start at preping the p/s of the car now I have door fitted. 2 Quote Link to comment Share on other sites More sharing options...
Paul Barrett Posted January 18, 2015 Share Posted January 18, 2015 Lookin good Chris! Quote Link to comment Share on other sites More sharing options...
mantaray Posted January 27, 2015 Author Share Posted January 27, 2015 Well after 18 months the car is finally back to the stage it was with the underside now all painted again. I had the underside blasted again to remove all the old paint that did not addhere properaly, then etch primed the whole underside before doing all the seam sealer. This time round, I have used Upol Raptor after it being recommended by RetroPower. I must say that I am rearly impressed with it. Goes on with ease and gives a real factory look. It comes in a 4 liter kit which was just enough to do the car but I got a second kit to make sure it has a full cover. Got a chap comming round at the end of the week, to give me a cash price for doing the body prep ready for paint, so if all goes to plan I hope to have it in top coat by the end of Feb. Only problem is I still don't know what colour to paint it.LOL. 2 Quote Link to comment Share on other sites More sharing options...
tony g Posted January 28, 2015 Share Posted January 28, 2015 Looking good Chris Be nice to see it on wheels again Tony Quote Link to comment Share on other sites More sharing options...
mantaray Posted May 7, 2015 Author Share Posted May 7, 2015 Car is now in the body shop getting preped ready for paint. :thumbup Also had a bit of bling sorted for it. 2 Quote Link to comment Share on other sites More sharing options...
MicsManta Posted May 9, 2015 Share Posted May 9, 2015 get your sunglasses out. looks like you are making very good progress. keep up the good work. Quote Link to comment Share on other sites More sharing options...
Paul Barrett Posted May 9, 2015 Share Posted May 9, 2015 Come on Chris anymore updates! Quote Link to comment Share on other sites More sharing options...
mantaray Posted May 11, 2015 Author Share Posted May 11, 2015 Going to be in body shop for probably another month, hope to have it back by the end of June. Having a look for a Power Loc LSD and programable ECU at the moment. Also sorting out my 1800 GT for tax at the end of the month so I can at least come to Billing in a Manta for the first time in 8 years. 1 Quote Link to comment Share on other sites More sharing options...
mantaray Posted May 12, 2015 Author Share Posted May 12, 2015 Spent another good day over at the body shop, Drivers side and nose cone are almost finished, passenger side just need one more skim. Then get some primer filler on her and flat it all back. Also sorted out a 3.27:1 LSD from an X300 Jag, that I've got to go and collect sometime this week. :thumbup 1 Quote Link to comment Share on other sites More sharing options...
Dougs Posted May 13, 2015 Share Posted May 13, 2015 Looking good mate I love seeing cars at this stage Quote Link to comment Share on other sites More sharing options...
mantaray Posted September 25, 2015 Author Share Posted September 25, 2015 Well been a while as progress has been slow trying to fit it in around the paying work, but we are now in to the final stages of prep. Engine bay, boot area and doors & door shuts are now ready for top coat, just need to do a final guide coat and flat on main body and we should be good to go. Project images are available to Club Members Only, Click to become an OMOC Member. Project images are available to Club Members Only, Click to become an OMOC Member. Project images are available to Club Members Only, Click to become an OMOC Member. Project images are available to Club Members Only, Click to become an OMOC Member. Project images are available to Club Members Only, Click to become an OMOC Member. Project images are available to Club Members Only, Click to become an OMOC Member. Project images are available to Club Members Only, Click to become an OMOC Member. Project images are available to Club Members Only, Click to become an OMOC Member. Project images are available to Club Members Only, Click to become an OMOC Member. Project images are available to Club Members Only, Click to become an OMOC Member. Project images are available to Club Members Only, Click to become an OMOC Member. 2 Quote Link to comment Share on other sites More sharing options...
Paul Barrett Posted September 27, 2015 Share Posted September 27, 2015 Awesome mate, must get that manifold sorted now 1 Quote Link to comment Share on other sites More sharing options...
mantaray Posted October 6, 2015 Author Share Posted October 6, 2015 (edited) After spending the day over at the body shop, we have finally reached the end of phase 2. I now have some color on the car. Ok it's only the engine bay, inside the bonnet, door shuts, boot shuts and inner boot lid, for the moment, but the rest is now ready to be painted this weekend. Project images are available to Club Members Only, Click to become an OMOC Member. Edited October 24, 2015 by mantaray 2 Quote Link to comment Share on other sites More sharing options...
turbo16n Posted October 7, 2015 Share Posted October 7, 2015 Looking good Chris Quote Link to comment Share on other sites More sharing options...
evo3000 Posted October 7, 2015 Share Posted October 7, 2015 (edited) What colour have you gone for chris? it looks a lot like Vxr chilli orange to me,like on this corsa http://www.ebay.co.uk/itm/2012-CORSA-VXR-1-2-LIMITED-EDITION-1-OWNER-FROM-NEW-WITH-FVSH-RARE-CHILLI-ORANGE-/151836873478?hash=item235a2ed306 Edited October 7, 2015 by evo3000 Quote Link to comment Share on other sites More sharing options...

Recommended Posts
Join the conversation
You can post now and register later. If you have an account, sign in now to post with your account.