Julian Posted April 30, 2014 Share Posted April 30, 2014 Dave hit the nail on the head regarding the tail lights, the red is chalky and faded looking, especially noticeable against the new paint. Going black would mean it would look 'fresher' I love all the brightwork i wouldnt have it any other way I am just so thankful this car was 100% complete, all the bright work is in really good condition considering the cars age and the condition the car was in itself! Except the wheel arch trims which are to far gone, I have some 10 mm self adhesive chrome trim coming to replace them. The Berlinetta badge as well as some of the rubber bump strips are going to have to be held on with double sided adhesive tape, I got the best stuff I could find, but am still worried they may blow off! Interior will be 100% original, it is in fantastic condition Why have you got to stick the Berlinetta badge on, is it because the little pins on the rear have broken off? If so I have a very nice one that you are welcome to, if you want it Pm me your address and I will pop it in the post for you. Quote Link to comment Share on other sites More sharing options...
kenny dock Posted April 30, 2014 Share Posted April 30, 2014 Dave hit the nail on the head regarding the tail lights, the red is chalky and faded looking, especially noticeable against the new paint. Going black would mean it would look 'fresher' I love all the brightwork i wouldnt have it any other way I am just so thankful this car was 100% complete, all the bright work is in really good condition considering the cars age and the condition the car was in itself! Except the wheel arch trims which are to far gone, I have some 10 mm self adhesive chrome trim coming to replace them. The Berlinetta badge as well as some of the rubber bump strips are going to have to be held on with double sided adhesive tape, I got the best stuff I could find, but am still worried they may blow off! Interior will be 100% original, it is in fantastic condition where are you getting the chrome wheel arch trim? i could be doing with replacement. kenny Quote Link to comment Share on other sites More sharing options...
Rapierdave Posted April 30, 2014 Share Posted April 30, 2014 where are you getting the chrome wheel arch trim? i could be doing with replacement. kenny Hi Kenny iI believe he is going to fit self adhesive half round flexible plastic chrome strip similar to the profile on your windscreen rubbers. I had the same fitted to a Cavalier Sportshatch i used to own & it looked ok 1 Quote Link to comment Share on other sites More sharing options...
®evo03 Posted May 4, 2014 Share Posted May 4, 2014 another epic project nearing completion! styling is perfect, would have it any other way. Another example of what can be done, this treat is ear marked for another thorough read! again!! Best of luck with the remaining finishing touches, and health to enjoy. Ps, Red lights, try Motocross plastic restoration video on YOUTUBE. involves really fine wet and dry, but does look good. Once done,I would say good wax or even clear coat would stop future fading. Ive yet to try this, as I am in same situation. rear red surround fade! 1 Quote Link to comment Share on other sites More sharing options...
GTREA Posted May 5, 2014 Author Share Posted May 5, 2014 Why have you got to stick the Berlinetta badge on, is it because the little pins on the rear have broken off? If so I have a very nice one that you are welcome to, if you want it Pm me your address and I will pop it in the post for you. Thats very kind Julian yes the pins on the back were very corroded and broke on removal, I've tried to pull it off and I cannot, its on there good so I don't think it will blow off......but if it does and you still have it I will pm you where are you getting the chrome wheel arch trim? i could be doing with replacement. kenny Yes just 10mm self adhesive chrome trim from ebay http://www.ebay.com.au/itm/190869574276?ssPageName=STRK:MEWNX:IT&_trksid=p3984.m1497.l2649 Its what this guy has used to good effect I think (well I actually dont have a choice! ) Little more progress, surprisingly time consuming process metal cleaning all the trim before refitting! Most of the front end back together Both headlight wash wiper motors work Whilst cleaning the headlights in the sink under hot water the friggin lens fell off one of them! (RHS pic above) I resealed with silicone but worried if they cannot handle a little heat will the other fall out in our sun?.....also whilst the lens fell off I thought id 'brasso' the dirty headlight reflector.....BIG mistake it did not polish it ripped off the silver that was on there, turning it a bronzey colour Side windows fitted. What a stupid idea those little single sided chrome hinges are!...I ordered these much more stable looking versions http://www.ebay.com.au/itm/370871151113?ssPageName=STRK:MEWAX:IT&_trksid=p3984.m1423.l2649 Front and rear screens get fitted Thursday, $100 sealed and new chrome fitted, money well spent I reckon rather than i try to refit and break them. Also ordered a new chrome petrol cap and new electric aerial 1 Quote Link to comment Share on other sites More sharing options...
gary6303 Posted May 5, 2014 Share Posted May 5, 2014 Very nice car that mate, love the colour, and the wheel combo. 1 Quote Link to comment Share on other sites More sharing options...
brianm Posted May 6, 2014 Share Posted May 6, 2014 Love the way this is going, and to think I was going to go and have a look at this when it was on ebay cause it was just up the road )) Quote Link to comment Share on other sites More sharing options...
GTREA Posted May 6, 2014 Author Share Posted May 6, 2014 Yeah it sat on ebay for a good month or so, suprized it did not sell sooner? 1500 quid to much perhaps? Still lucky for me it did not Quote Link to comment Share on other sites More sharing options...
kenny dock Posted May 8, 2014 Share Posted May 8, 2014 Excellent. Cheers for the info on chrome. You and Dave. I was expecting to run the trim on the inside lip of the arch. Not sure about how it looks on the outside edge. My chrome is untidy on the inner edge. Hope it works. Quote Link to comment Share on other sites More sharing options...
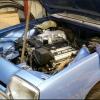
GTREA Posted June 9, 2014 Author Share Posted June 9, 2014 (edited) My Chrome trim arrived and I had a professional window fitter come around and fit it, turns out he was from Biringham and was a 40 year old bloke like me and did he freak out when the garage door went up...." A Manta!...aint seen one of those in 20 years!" Loving the reaction I get from all that have seen this car over here, especially the english people! But the chrome was not sufficient to complete the job! Little bit of a protracted discussion to resolve issue atm with eBay seller Anyway the engine is in.....kinda We sat the engine in a few weeks back and soon realised height was going to be an issue. Yesterday I went out to my mates where the car resides now and we got the engine sitting in there properly So knowing it was going to be tight fit under the bonnet (if it fitted at all) I bought some engine mounts from CAPA (a supercharger company over here) which minimise flex. Original mounts had to go from cross member In order for the engine to sit under the bonnet, the steering rack has had to be removed and will be lowered, and the cross member will be scalloped a bit for clearance to the sump and to suit the lowered steering rack. The motor just fits under the bonnet, without removing any of the structure underneath the bonnet, and with the sump just resting on the cross member. Motor sits very nicely, plenty of room for radiator and I think I may be able to get 'a' booster in there as well with 110- 120mm clearance to engine (manta booster around 100mm deep) May be room for the factory heater box to with 'about' 270mm from firewall to motor (Manta heater box about 280mm deep) Going to be close! Standard exhaust manifolds fit, and are not cast so can be welded, I just cut the Cats and exhaust temp sensors off here. Drivers side one does cross right in front of steering arm so last port will have to be re-routed. Checking everything is level My mate made this up to make sure the engine was perfectly centralised....and stayed centralised. Ta daaa....bonnet fits, tight but no problem.....and catch needs to be raised about 5-10mm as bonnet sits low at front All in all pretty happy it all fits in there! bar some fucking around with the steering rack but should be ok. Two weeks time......Transmission into tunnel! Edited June 9, 2014 by GTREA 5 Quote Link to comment Share on other sites More sharing options...
MANTAMAN Posted June 9, 2014 Share Posted June 9, 2014 I just cut the Cats and exhaust temp sensors off here. The exhaust temp sensors are probably Lambda sensors which read the exhaust hydrocarbons and provide a close loop feedback to the ECU addjusting the fueling, the engine might not fuel correctly or even run without them, they need to be at relevantly the same postion to their original position to work at their best. Quote Link to comment Share on other sites More sharing options...
GTREA Posted June 10, 2014 Author Share Posted June 10, 2014 Sorry I probably did not word that very well. The sensors will be going back in But just aft of where I chopped the manifold on the 1 UZ is a small catalytic converter, a large flange and the sensor, it just was never going to fit the manta. Sensors will be refitted and just one large catalytic converter will be fitted (by law) further down the system. Quote Link to comment Share on other sites More sharing options...
GTREA Posted June 22, 2014 Author Share Posted June 22, 2014 Things have really slowed on this now, I only get to work on it for around 4 hours every 2 weeks. Today we trial fitted the trans to the tunnel, and it fits no problem at all....much to my surprise! Note where the steering column goes thru the exhaust manifold here!.....there is room to cut and go around though. We are going to have to change engine mounts, as the ones I have are to bulky, im just going to buy these CRS 1UZ to Holden Torana mounts. They will not be an exact fit but will be damn close and will save a lot of time fabbing up from scratch Steering rack is now the only real issue to fitting this engine I do not think the crossmember will need any scalloping anymore, for the sump or the rack, but The small section of the rear part of the metal sump pan needs cutting away and the crossmember itself may need dropping 10mm. Its mainly the knuckle on the top of the steering rack which is conflicting with the sump pan just on the edge where it bolts up....so close. 1 Quote Link to comment Share on other sites More sharing options...
CRAZYDAVE Posted July 29, 2014 Share Posted July 29, 2014 Any updates? Did you need to lower the steering rack in the end? Some great work there Quote Link to comment Share on other sites More sharing options...
opelmantagsi Posted October 19, 2014 Share Posted October 19, 2014 Bump. Quote Link to comment Share on other sites More sharing options...
CRAZYDAVE Posted December 23, 2014 Share Posted December 23, 2014 Bump Quote Link to comment Share on other sites More sharing options...
GTREA Posted January 4, 2015 Author Share Posted January 4, 2015 Sorry no updates Totally hit a brick wall on this, I cant believe it after the early progress Mates got a few issues in his life, and no time for this unfortunately, and now its in a state where it has no steering and the engine and box are still not welded in Its already to go, everything is sitting in place....but its just not happening Just sitting here like this I will give it until the end of the month and then pull it out of there. Quote Link to comment Share on other sites More sharing options...
CRAZYDAVE Posted January 4, 2015 Share Posted January 4, 2015 Sorry no updates Totally hit a brick wall on this, I cant believe it after the early progress Mates got a few issues in his life, and no time for this unfortunately, and now its in a state where it has no steering and the engine and box are still not welded in Its already to go, everything is sitting in place....but its just not happening Just sitting here like this I will give it until the end of the month and then pull it out of there. You'll find a way got to be someone who can help you Car still looks fab get that mojo back! 1 Quote Link to comment Share on other sites More sharing options...
Paul Barrett Posted January 4, 2015 Share Posted January 4, 2015 What a shame. oh well, like Dave said you'll find a way, looking good though, can't waitfor you to get I fired up! 2 Quote Link to comment Share on other sites More sharing options...
GTREA Posted January 4, 2015 Author Share Posted January 4, 2015 You'll be firing yours up before mine at this rate Paul haha 1 Quote Link to comment Share on other sites More sharing options...
GTREA Posted January 18, 2015 Author Share Posted January 18, 2015 Ok we finally managed to get another 4hrs in on this yesterday, and all of it spent fucking around with the god damn steering rack and column!....but we are now almost there. Once thats all in place then its a matter of quickly knocking up the engine and Trans mount so I can take the car away to finish off all the other bits and pieces like exhaust, Brakes and wiring. It all looks a little messy atm but it really is just so I can get the car moving and steering with everything in place. I will drop the cross member back at my mates house so he can make it all look 'Factory' again and not some back yard Hack job! Pics Here you can see where the steering goes thru the crossmember, we extended the arm so the large rubber joint does not foul on the Crossmember itself. 1 Quote Link to comment Share on other sites More sharing options...
Paul Barrett Posted January 18, 2015 Share Posted January 18, 2015 Tight in there isn't it! I had even less room In my A! Quote Link to comment Share on other sites More sharing options...
GTREA Posted January 19, 2015 Author Share Posted January 19, 2015 Yeah I don't think me and the exhaust bloke will be 'Friends' anymore after I drop this off for him to work on I might try and source some exhaust manifold Bolts, rather than the factory Studs so the exhaust Manifolds will come off easier......even then they will be hard to remove and refit I would say! Quote Link to comment Share on other sites More sharing options...
CRAZYDAVE Posted January 19, 2015 Share Posted January 19, 2015 Getting there Quote Link to comment Share on other sites More sharing options...
GTREA Posted March 3, 2015 Author Share Posted March 3, 2015 Another 6 weeks another few hours work First 20 minutes spent clearing all the shit Now to make the engine mounts, LH Holden Torana to 1UZ CRS engine mount kit was used, which came close, and saved a lot of fucking around but some extra fiddling was required to get it to mate with the Opel Crossmember Tacked in place How she sits in the bay All engine...a'lotta engine for a small car! Just the Gearbox mount to go now and I can take it away to have the exhaust fitted, brakes plumbed, and engine wired, as well as finish off all the other little jobs I can do at home, then I will drop it back at my mates so he can tidy up all the welding so it looks all nice and 'factory' and not a Russian tractor as it does atm 4 Quote Link to comment Share on other sites More sharing options...

Recommended Posts
Join the conversation
You can post now and register later. If you have an account, sign in now to post with your account.